Vinyl Record “Now Playing” Shelf

Finally tackled this project to make an record shelf for our currently playing record! We’ve needed one for a while and I couldn’t stomach buying one when I knew it’d be an easy project. Thanks to my wife for being so patient.

Shelf is made from a single oak board and finished with paste wax and adhered to the wall with brass screws:

Process

I started with a 2″x2″x20″ oak board. I cut it down to length and then raised the table saw blade up and started to remove the middle of it to create the spot where the record sits. Then another pass to shorten the front lip so you can see the full record. After that some sanding to clean it up and soften the edges.

This created a lot of sawdust. The “easier” way to do this would have been to glue up the back, front, and bottom from separate pieces of wood. The aesthetic wouldn’t be the same, but most people wouldn’t notice or care .

When looking around for examples of shelves like this I found that most of these things are hung using keyhole slots. I absolutely hate keyholes though! They assume a lot about the flatness of your wall and are just a pain to get lined up and installed. Made the call to have the screws visible and I’m happy with the result.

(Screws clocked, of course, because I’m not a scrub and don’t want Sam Firke to be disappointed in me.)

Also! I like this detail where the knot is part of the shelf:

Display Case for Science Bee

My wife does craft shows as the Science Bee and she needed a larger display case for her table. This absolute unit is two 2’x4’ pegbaord panels on a hinge:

Here it is closed up. You can see the handles on the top that make moving it around much easier:

And here it is in context on the right side of the table. The smaller case on the left of the table was supposed to be a prototype before I made the “real” one. That was many many years ago. I guess it did serve its purpose though since the new one follows it as a plan, just larger:

And, for Ann Arbor superfans, the frame for this was repurposed wood from the old Workantile Phone Booth project!

Dice Tower

This year my podcast, Roll for Topic, held its first convention. For one of the door prizes I made a dice tower reusing some ash flooring that a friend had gifted me. Here’s the finished piece:

I’m very happy with out it turned out. The brass discs on the outside are for the internal pins that help randomize the dice rolls. Sanded up to 400 grit and finished with paste wax. It has a super smooth feel to it and dice make satisfying sounds as they go through the tower.

Process

First up planing to get the wood down to the right thickness. I really need a planer with any dust collection…Or a bandsaw that can accurately rip boards down to size.

Next cutting the pieces to size. A crosscut sled and an adjusted miter saw were key here:

The glueup happened in stages and like all glue ups was difficult and annoying:

Lots of little pieces that wanted to slide everywhere:

Right when i was “done” I decided to add in some brass rods to help with the randomness of the rolls. This added a lot to the overall look and feel of the piece and I’m very glad I went for it.

Here’s a test fit. Once I was sure of the sizing I pulled these out and rounded the sharp edges a bit more:

And what they looked like on the outside after finishing:

Twice Reclaimed Ash Box

A while back, a friend had an ash tree from their yard milled into floorboards. Those then those sat in storage until they moved and he donated the lot of them to me. As a thank you gift I made this small box for him:

I tried to keep details from the floorboards intact. The pull on the lid is part of the tongue from the boards and the lip on the box is from the groove. The bottom I planed down thin enough to show a bit of the separation between the boards (I swear it was intentional!)

I’m particularly proud of the tight miters on this one and the fact that the lid will fit no matter the rotation.

Materials: twice reclaimed ash

Finish: two coats of shellac and a coat of paste wax.

Small Box For Beach Treasures

On Friday we went to the beach in Port Huron, MI and my daughter collected rocks and shells. The rest of the weekend I worked on making a small box for her to keep those treasures in. Final dimensions came out to about 3.25”x2.25”x2”. Materials were white oak and Titebond III. Finished with three-ish coats of shellac buffed to a satin finish with steel wool.

Pictures taken in every woodworking project’s natural environment: outside in the grass on top of a scrap of figured walnut.

A small box is much harder than a big box.

The boards for this were resawn on the band saw from a single piece of scrap wood and then planed down to roughly 1/4″ on a thickness planer. I wanted crisp mitered corners, but the small pieces kept tearing out on the table saw and, frankly, I was closer to the blade than I wanted to be for those cuts, so I settled for simple butt joints. Now that it’s all together I quite like the look of the exposed end grain all around it.

You make boxes like this by gluing it all up as a solid rectangular cuboid (aka “a box”) and then cut around four edges to pop the lid off. Cutting the lid off is moderately harrowing; however, the upshot is you get continuous grain from the base to the lid and that makes woodworkers happy.

After the lid was free there was another hour or two pairing down high spots and squaring everything up with a sharp chisel. Then another hour or two hand sanding everything smooth from 100-220.

The little jagged tabs that align the lid and let it stay snugly in place were made by snapping some offcuts off with a pair of pliers and then artfully sanding them down. It’s a fun look and gives the design some teeth. It’s very satisfying to pop the lid on and off. And you can fit the box in the upturned lid as well. An unintended affordance, but delightful!

A Dad Goal of mine is that my kids grow up with little handmade curiosities like this littered about the house. My daughter smiled when I gave it to her and said “I’m going to put it in my room!”

A pile of knives

Our previous methodology of storing our knives was a pile in one of the drawers. In a nod to safety we had a scrap piece of wood in there as a divider to keep them separate from the non-pointy kitchen utensils.
It wasn’t the worst system. It wasn’t the best either. So I made a better one:

This took a few hours a few weeks ago and has made our knives a lot safer and easier to use. Grabbing one now doesn’t feel quite as fraught! I should have made it years ago.

Design Notes

  • The slots for the blades were made with kerf cuts on the table saw. I tried a few different manual saws because I aspire to being one of those philosophical back-to-basics handtool woodworkers. Turned out that the table saw blade was already the right width so I was able to save myself a lot of trouble.
  • Our drawer space is at a premium so having two rows of knives on the right lets save some space, while still making everything accessible.
  • This is highly customized to our random collection of knives. I designed it mostly by measuring the longest knives in each category (short ones in the front on the right, medium in the back on the right, long in their own compartment on the left) and then just going for it. Winging it is fun, but it did result in a lot of back and forth of test fitting.
  • The rows are slightly offset so that handles aren’t covering blades. I mean, of course they are, however, this wasn’t clear to me until I started to lay it out.
  • It’s a friction fit. We can easily remove it if we decide we want something else later on.
  • Made out of scrap pine and sealed with paste wax. I lightly rounded over all the edges with 120 grit sandpaper.

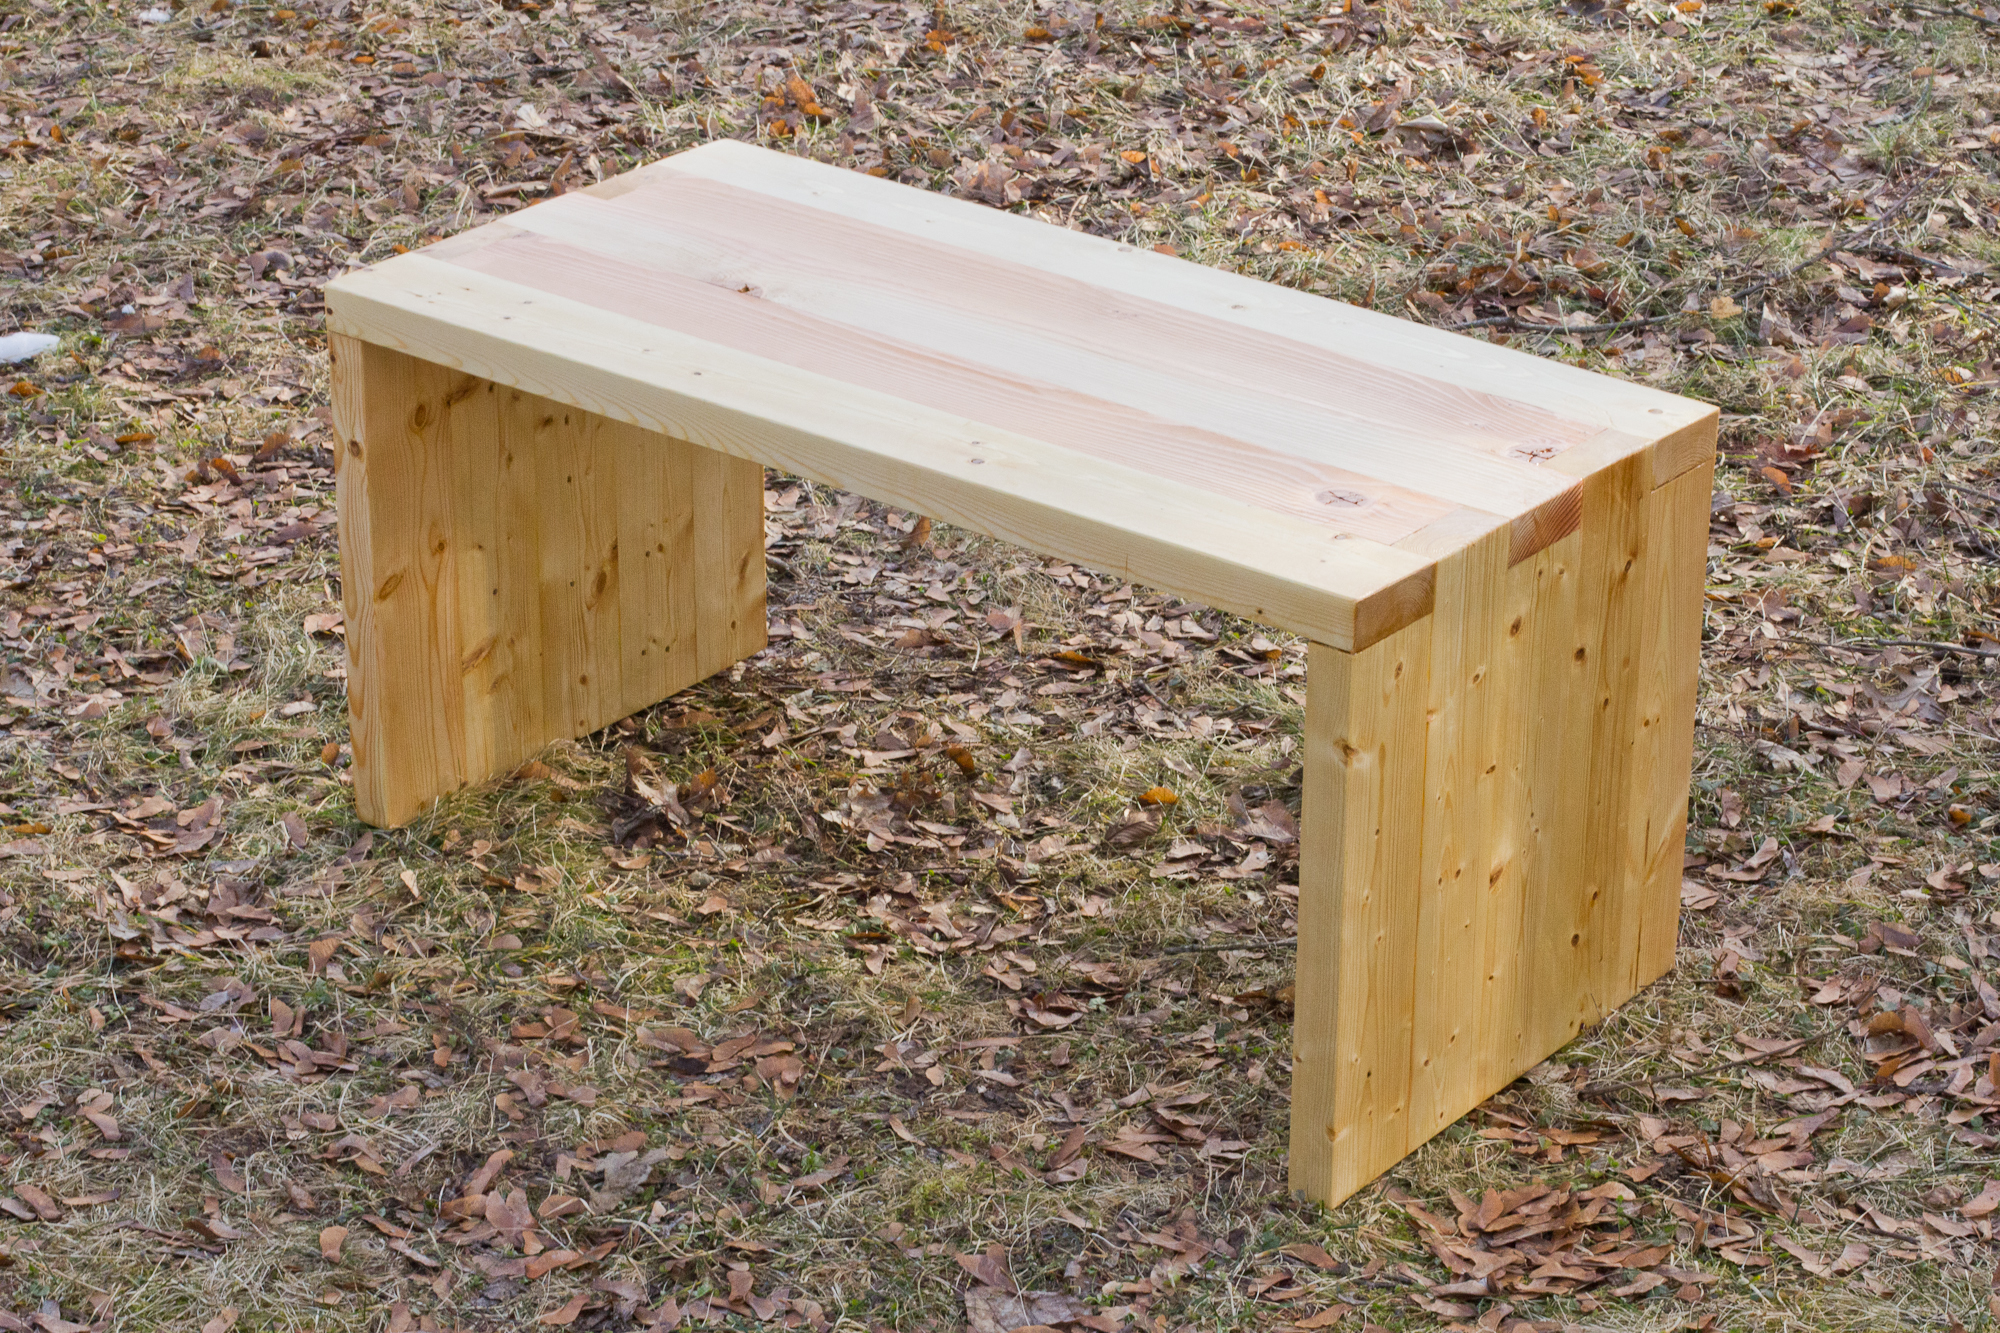
2×4 Bench, Rustic Strength

Finally finished this bench I’d been slowly working on. This was the second attempt at a similar design. Both found homes with friends. The first one will live near a firepit and this one will end up inside as a bench near an entrance. Final size is about 33″ wide by 16″ tall.

The wood came from scrap 2x4s and the box joint configuration created a surprisingly strong bench!

Started by milling the 2x4s on the thickness planer and table saw to get square edges and flat faces. None of them were acceptable without this step for the finish quality I was going for.

After milling, I cut the top and sides to slightly longer than needed. Then I attacked worst part of this project: the glue up. I didn’t want to have any screws or nails involved so gluing involved a lot of clamps and annoyances. Once it dried I evened out the legs and top ends with a circular saw, chiseled and hand planed everything reasonably flat and then sanded (a lot). Finished with a few coats of clear shellac.

I’d been wanting to try this technique for a while. After trying it? It’s neat, but oh-so-fiddly to get right. What I learned is that I never want to use 2x4s for “fine” furniture again if it can be avoided.

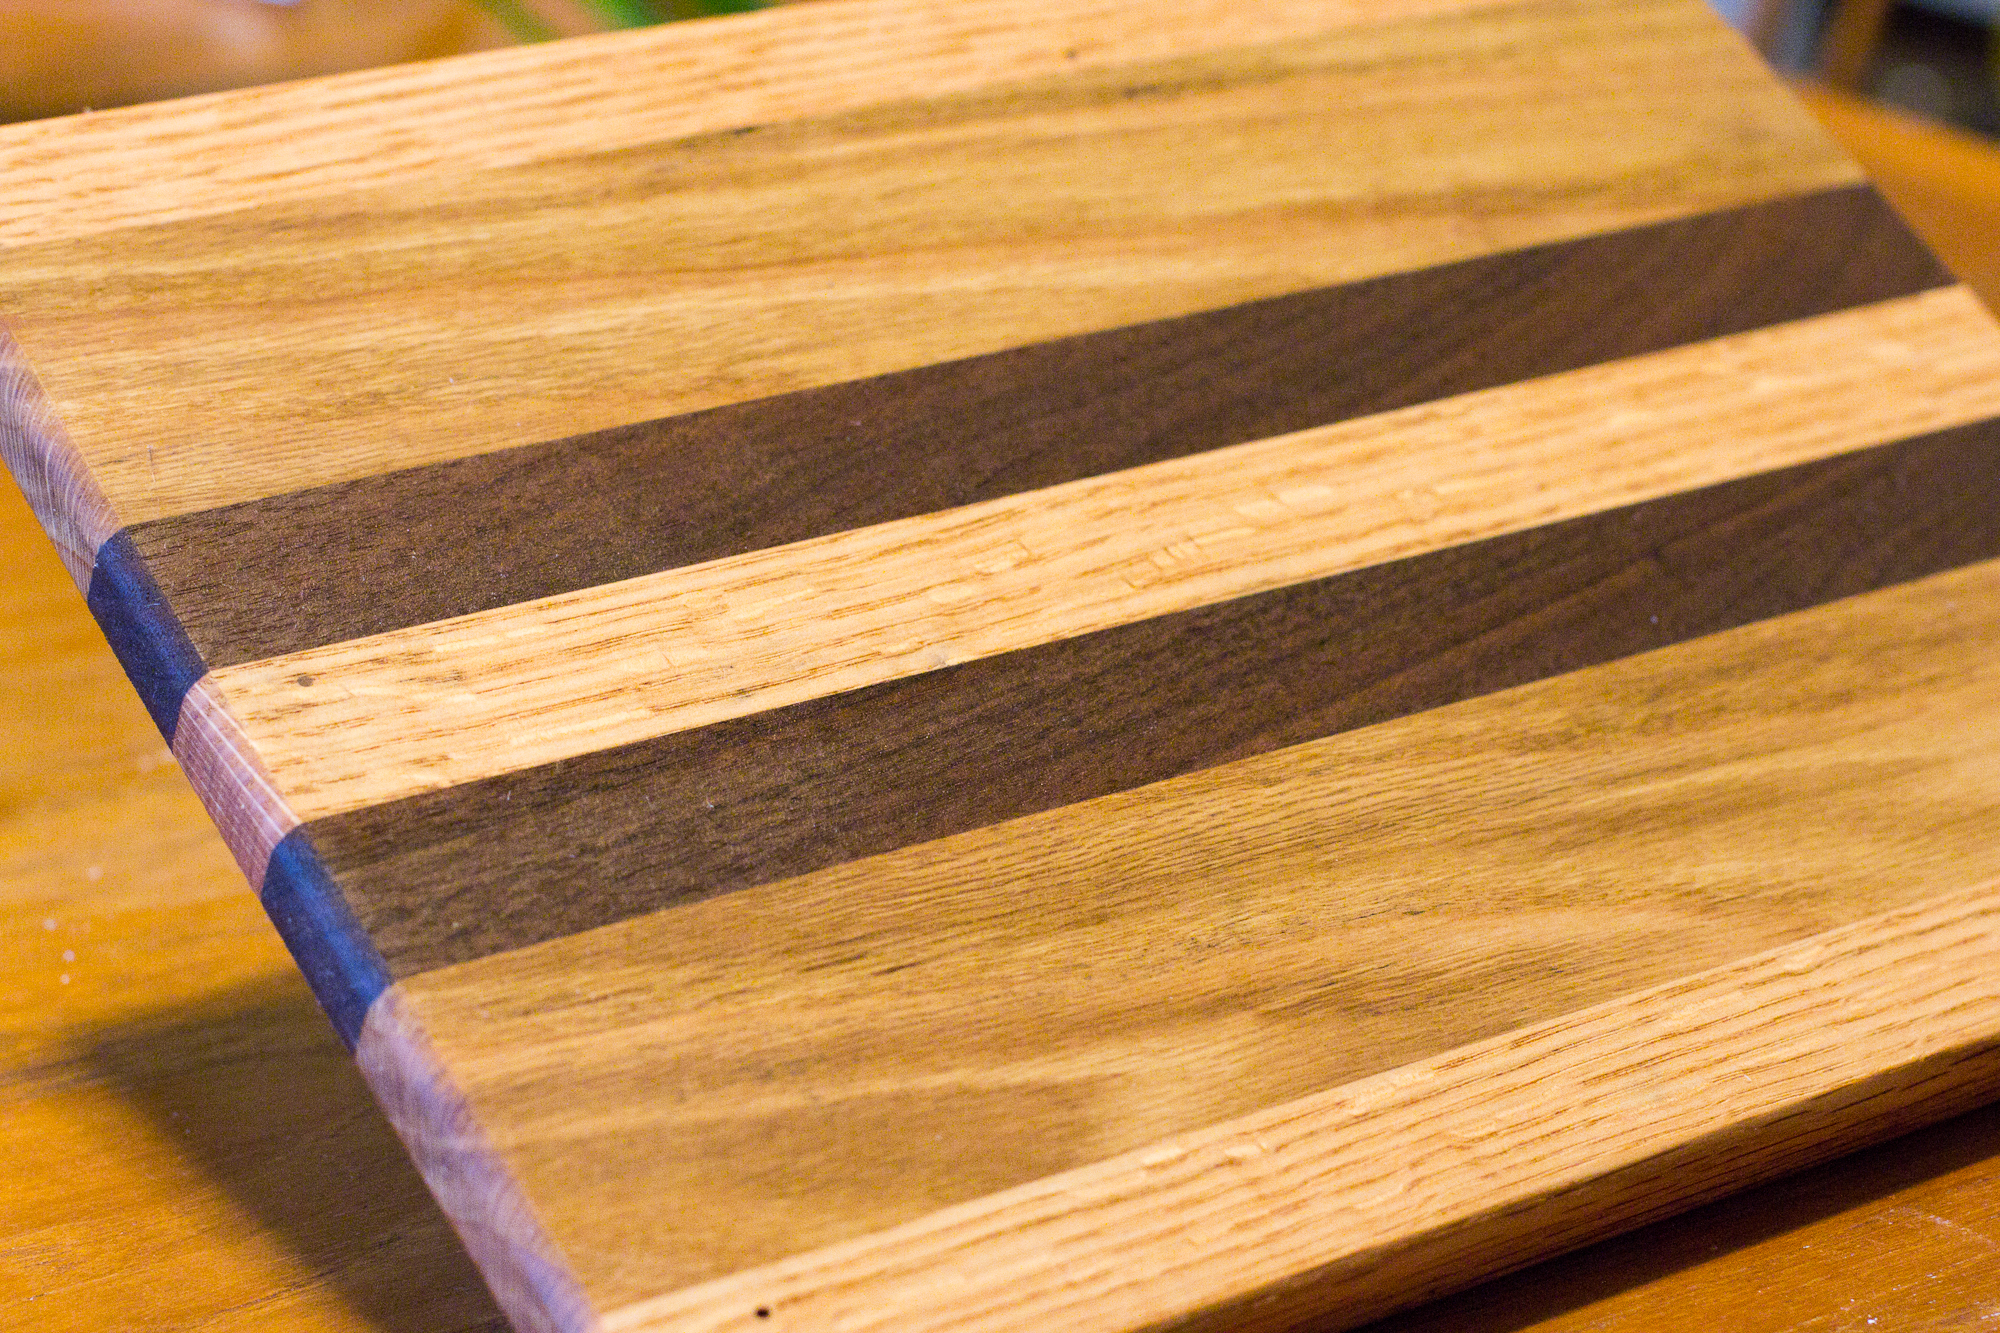
Cutting Boards, Racing Stripes Edition

Made two cutting boards yesterday! I have the week off from work and so naturally spent a few hours in the shop. One is spoken for, but another is still available as of yet ($40). Edit: Both are sold! Talk to me if you want one though since I’ll do another batch later this month!

Dimensions are around 9″x12″ with rounded edges. Pattern is: red oak, oak, walnut, red oak. The walnut came from a friend who had it in his basement and the rest is from Urbanwood. Finished with Howards Butcher Block Conditioner.

A Cutting Board, A Cut

A Cutting Board

Finished this cutting board yesterday. Made from oak and walnut. I love the grain on this, it’s wild and varied and unexpected. Measures about 8″x12″ with rounded corners and two usable sides.

The knot at the top is filled in with clear epoxy, which worked well and is a nice detail. I’m curious to see how it will wear over time.

Finish is a beeswax+mineral oil blend from Howard called Butcher Block Conditioner. Wood is from Urbanwood.

If you like the look of the above and would like one of your own, I’m open for commissions. Contact me and we can figure out a price and delivery date!

A Cut

About halfway through making this I did something very dumb and ended up with four stitches in the side of my index finger. I’ll spare you the details, but will tell you the lesson I learned:

Your hand is not a clamp. Never use it as one, even if it seems convenient.

It was nice to confirm that my chisel sharpening technique is good. The wonderful person who stitched me up said it was a clean cut. Something I do after I hurt myself is google for similar injuries. It’s comforting knowing you’re not alone and a great relief when you don’t pull up any obits.

Due to the circumstances, I’m going to keep this cutting board because you should always keep your enemies close.